Are you on a perpetual quest for that perfect snack – one that’s satisfyingly crunchy, packed with flavor, and surprisingly healthy? Look no further than the humble chickpea, transformed! While often celebrated for its creamy texture in hummus or its hearty contribution to stews, the chickpea truly shines when roasted to golden, irresistible perfection. Achieving truly crispy chickpeas, however, can sometimes feel like an elusive culinary magic trick, leaving many with merely chewy results. But what if we told you the secret to unlocking ultimate crunch is within reach, with a few essential tips and tricks?
Imagine a savory, perfectly spiced bite that rivals your favorite potato chips or pretzels, but offers a fantastic source of plant-based protein and fiber. From a simple can of chickpeas to a hot oven, we’ll guide you through the process of creating your new favorite crunchy chickpea snack – golden-brown morsels bursting with flavor. Whether you’re a seasoned home cook or a kitchen newbie, these insights will empower you to consistently create chickpeas that are not just good, but truly spectacular.
The Quest for Ultimate Crunch: Why Most Crispy Chickpeas Fail (and How Yours Won't!)
Many aspiring snack creators have faced the disappointment of under-roasted chickpeas – those that emerge from the oven looking promising, only to quickly descend into a sad, chewy state. The key differentiator between merely baked and truly crispy chickpeas lies primarily in moisture management and adequate cooking time. Think of it like this: moisture is the arch-nemesis of crispiness. Any lingering water on or within the chickpeas will steam them rather than roast them, leading to that dreaded soft texture.
To overcome this common pitfall, we employ a multi-pronged approach focused on drying and then thoroughly baking. This isn't just about throwing them in an oven; it's about understanding the subtle science behind achieving that coveted snap. Once you master these fundamental steps, you'll be able to create batches of crunchy goodness that stay crisp, ready to elevate any meal or satisfy any snack craving.
Step 1: Moisture is the Enemy – Taming the Chickpea
The journey to perfect crispy chickpeas begins even before they hit the baking sheet. A crucial initial step is to meticulously remove as much surface moisture as possible. Start by draining your canned chickpeas thoroughly in a colander and then rinsing them under cold water. This helps remove any residual canning liquid, which can contribute to a metallic taste and unwanted moisture.
Once rinsed, the real drying process begins. Spread the chickpeas out on a clean kitchen towel or several layers of paper towels. Place another towel on top and gently but firmly rub them with your hands. You want to apply enough pressure to blot away water, but not so much that you crush them. This process should only take a few minutes, but it’s arguably the most critical step for achieving genuine crunch. The drier your chickpeas are at this stage, the crispier they'll become.
But there's an even deeper hack for ultimate crispiness: removing some of their skins. Chickpea skins, while harmless, can trap and retain moisture, hindering that all-important crunch. While you don't need to remove every single one (and trust us, you'd be there all day!), taking off a significant portion can make a noticeable difference in texture. Here’s a simple method:
- After draining, rinsing, and initial drying, return the chickpeas to a dry towel.
- Place another dry towel over them.
- Gently rub the chickpeas between your hands, with the towels acting as a buffer. You’ll notice the skins beginning to loosen and come off.
- Don't obsess over perfection. A little goes a long way! Just a few minutes of this gentle rubbing will yield plenty of loose skins. Discard the skins and proceed with your now partially "naked" chickpeas.
This quick step, often overlooked, is a game-changer for consistently crunchier results, ensuring your oven or air fryer crispy chickpeas reach their full potential.
Flavor Fusion: Beyond the Basics for Your Crispy Chickpeas
Once your chickpeas are perfectly prepped and dried, it's time to infuse them with flavor! A light coating of oil is essential here – it helps the seasonings adhere and contributes to that desirable golden-brown exterior. Olive oil or avocado oil are excellent choices. Drizzle about 1-2 tablespoons per can of chickpeas, ensuring each little orb gets a shimmering coat.
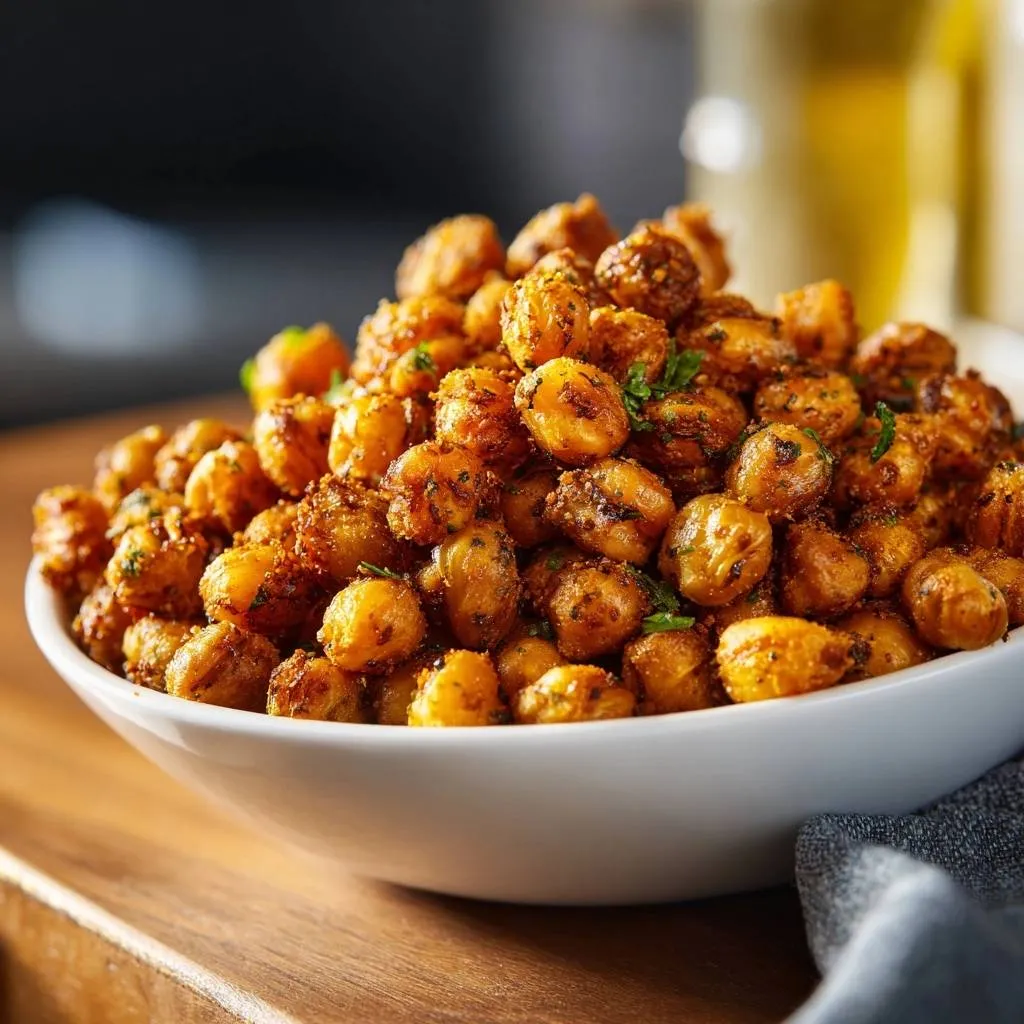
Now, for the fun part: seasoning! The reference context highlights a fantastic savory blend of chili powder, ground cumin, and smoked paprika. This combination offers warmth, earthiness, and a subtle smokiness that is incredibly addictive. But why stop there? The versatility of crispy chickpeas means the flavor possibilities are virtually endless. Experiment to find your personal favorite:
- Classic Savory: Garlic powder, onion powder, nutritional yeast (for a cheesy tang), dried oregano, black pepper.
- Spicy Kick: A pinch of cayenne pepper, red pepper flakes, or even a dash of sriracha powder for those who love the heat.
- Smoky & Bold: More smoked paprika, a touch of chipotle powder, or even a hint of liquid smoke (used sparingly).
- Herbaceous Delight: Finely chopped fresh rosemary, thyme, or dried Italian herbs.
- "Everything Bagel" Inspired: A generous sprinkle of everything bagel seasoning for a garlicky, oniony, poppy seed crunch.
- Sweet Treat: Believe it or not, chickpeas can go sweet! Toss them with cinnamon, a pinch of nutmeg, a spoonful of sugar (or maple syrup after baking, to prevent burning), and a tiny dash of salt.
- Exotic Flavors: Curry powder, garam masala, za'atar, or ras el hanout can transport your taste buds around the globe.
Ensure the seasonings are evenly distributed. You want every chickpea to be a tiny flavor bomb, ready to explode with taste and crunch in your mouth.
The Oven's Role: Baking to Golden Perfection (and Beyond)
With your perfectly dried and seasoned chickpeas ready, the final frontier is the oven. Preheat your oven to a relatively high temperature, typically around 400°F (200°C). This high heat is crucial for drawing out remaining moisture and achieving that crisp exterior without over-drying the interior too quickly.
The baking vessel matters, too. Spread your chickpeas in a single layer on a large baking sheet. Avoid overcrowding the pan; if the chickpeas are piled on top of each other, they will steam instead of roast. If you're making a double batch, use two separate baking sheets. Line your baking sheet with parchment paper for easier cleanup and to prevent sticking. A metal baking sheet, rather than glass, also promotes better browning and crisping.
The exact bake time is where intuition and observation come into play. While a general range of 45-60 minutes is a good starting point, this can vary significantly depending on your oven's calibration, the specific brand of chickpeas, and even the humidity in your kitchen. Here’s what to look for:
- The Visual Cue: Chickpeas should be deeply golden brown, almost mahogany in color. They will visibly shrink slightly and develop a crinkly texture.
- The Sound Test: When you gently shake the baking sheet, they should sound dry and rattle.
- The Taste Test: The ultimate decider! Carefully remove one or two, let them cool for a moment (they'll crisp up more as they cool), and taste. They should be unequivocally crunchy, not chewy. If they're still a bit soft, continue baking, checking every 5-10 minutes.
Remember, under-baking is the main culprit for soggy chickpeas the next day. It’s better to slightly over-bake them than under-bake. However, be mindful not to burn them – a burnt chickpea is a hard, bitter chickpea. Watch them closely in the final 10-15 minutes, as they can go from perfectly crisp to burnt very quickly. Once baked, remove them from the oven and allow them to cool completely on the baking sheet. They will continue to crisp up as they cool.
For those interested in an alternative method for achieving superior crunch, the air fryer is another fantastic tool. You can find detailed instructions and comparisons in our guide on Master Crispy Chickpeas: Oven & Air Fryer Crunch Secrets.
Elevating Your Meals: Creative Ways to Enjoy Your Crispy Chickpeas
While crispy chickpeas are undeniably addictive eaten straight from the bowl, they are also incredibly versatile and can elevate a multitude of dishes. Their satisfying crunch and robust flavor make them a fantastic addition to almost any meal needing a textural boost.
- The Ultimate Snack: Forget store-bought chips! These spiced, crunchy bites are a fantastic gluten-free and plant-based alternative to satisfy any savory craving. Pack them in a small container for an on-the-go energy boost.
- Salad Supercharger: Say goodbye to traditional croutons! Crispy chickpeas add a much more nutritious and flavorful crunch to any salad. They're particularly delightful on a fresh garden salad, a robust Kale Caesar, or a Mediterranean-inspired green mix.
- Grain Bowl Game Changer: Transform your everyday grain bowls. Sprinkle them over quinoa, farro, or brown rice bowls topped with roasted vegetables like sweet potatoes or cauliflower, a creamy tahini dressing, and fresh herbs. They provide an essential textural counterpoint to the softer components.
- Soup & Stew Enhancement: Add a delightful pop of texture and flavor to creamy soups (like tomato, butternut squash, or lentil soup) or hearty stews. Just a small handful sprinkled on top before serving makes a huge difference.
- Wrap & Taco Texture: Incorporate them into your vegetarian wraps, burritos, or tacos for an unexpected crunchy element. They pair beautifully with fresh salsa, avocado, and crunchy slaw.
- Snack Mix Hero: Create your own custom trail mix! Combine crispy chickpeas with your favorite nuts, seeds, and even some dried fruit for a personalized, nutrient-dense snack.
The possibilities are truly endless, limited only by your imagination. Their ability to deliver both flavor and texture makes them an invaluable ingredient in a health-conscious kitchen.
Achieving perfectly crispy chickpeas is not just a cooking technique; it's a culinary superpower that transforms a pantry staple into an extraordinary snack or meal enhancer. By mastering moisture removal, experimenting with bold flavors, and understanding the nuances of baking time, you can consistently create these addictive, crunchy morsels. So, drain that can, get rubbing, spice them up, and prepare to unlock the ultimate crunch. Your taste buds (and your snack game) will thank you!
